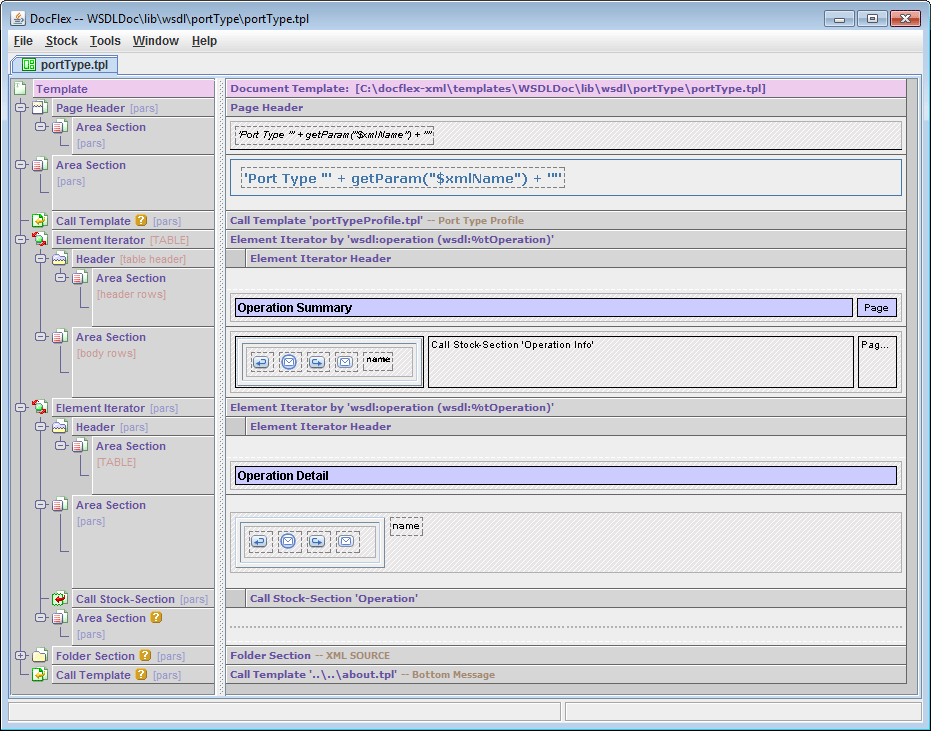
 This screenshot shows the “portType.tpl” template (from WSDLDoc template set)
open in the Template Designer (click to see in full size).
This screenshot shows the “portType.tpl” template (from WSDLDoc template set)
open in the Template Designer (click to see in full size).
There are basically four kinds of templates (or rather roles which they can play):
Main templates are those specified to the generator (only one at a time). A template set may include several main templates to generate different kinds of documentation (e.g. single file, framed multi-file, etc.)
This screenshot shows the “portType.tpl” template (from WSDLDoc template set)
open in the Template Designer (click to see in full size).
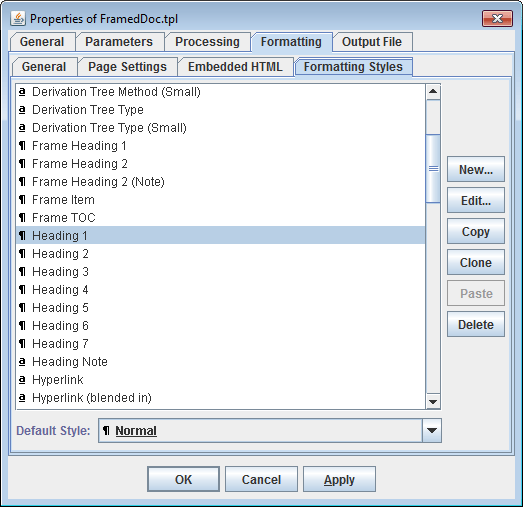
The left pane represents the structural components called sections, which are responsible for most of data processing as well as the generation of integral features of the output (such as paragraphs, tables, lists etc).
The right pane represents the components called controls, which generate particular content details (e.g. text, images, table cells etc). Controls are visualized in a form resembling the output they generate.
The output generator is actually an interchangeable part, which has separate implementations for each supported output format. What particular output format will be used is specified as the option.
Together the template interpreter and all output generators represent a single functional unit, which is called also “FlexDoc/XML Generator” (or simply generator). It is run from the Java command line as a separate Java application and controlled by lots of options.
Alternatively, most of these settings can be specified in a Generator GUI interactively. Its main dialog is shown on the following screenshot:

For further details, please see: FlexDoc/XML | Documentation | Running Generator
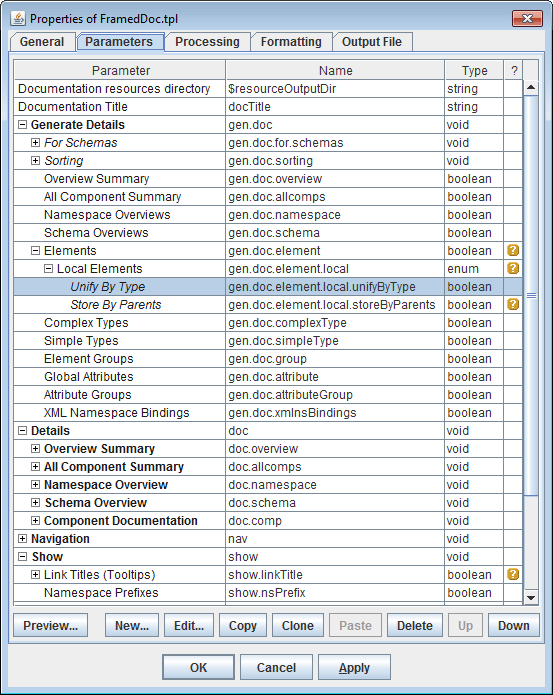
The parameters are defined and accessed in templates to control dynamic properties of template components (or pass data to them). They may be of various data types including list parameters, which allow passing a vector of values associated with the same parameter name.
Because template parameters are easy to introduce and support in templates (most of time actually takes writing their descriptions), a large template application (like XSDDoc) may have hundreds of parameters. This allows adjusting the generated documentation within a wide range of possibilities without changing the templates.
However, it also creates two problems:
 |
 |
Each template application is designed for a certain set of XML schemas, which describe all possible XML files the application may process (except some trivial cases, for instance, the reproducing of raw XML; see XMLDoc).
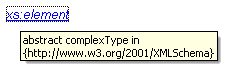
During the processing each input XML file is associated with some of those XML schemas
and each XML element becomes uniquely connected to a certain <xs:element> from it.
That is used to:
<xs:simpleType>/<xs:complexType>
components), from which the <xs:element>
is derived, also become associated with the XML element.
That makes possible to search and iterate by those XSD types – the abstract entities not even found
in the XML files themselves!
'wsdldoc'), through which
it is associated with the templates.
All information about the XML type is specified in an XML type configuration file
that is typically provided along with the template set, e.g.:
{WSDLDoc}/wsdldoc.xmltype
Example:
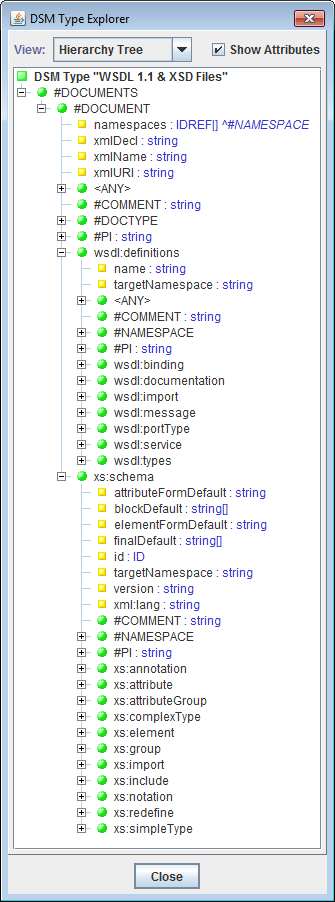 On this screenshot you can see a tree representation of the “WSDL 1.1 & XSD Files” XML Type.
It describes any number of input WSDL/XSD file as a single data source,
which is processed by the WSDLDoc template set
(click to see a more expanded view).
On this screenshot you can see a tree representation of the “WSDL 1.1 & XSD Files” XML Type.
It describes any number of input WSDL/XSD file as a single data source,
which is processed by the WSDLDoc template set
(click to see a more expanded view).
This XML Type is based on the following XML schemas:
http://www.w3.org/2001/XMLSchema.xsd
http://schemas.xmlsoap.org/wsdl/
http://schemas.xmlsoap.org/wsdl/soap/
http://schemas.xmlsoap.org/wsdl/http/
http://schemas.xmlsoap.org/wsdl/mime/
Element maps are particularly important in finding XML elements referenced by qualified names
(e.g. from various xs:QName attributes), which is typical, for instance, in XSD/WSDL files.
Example:
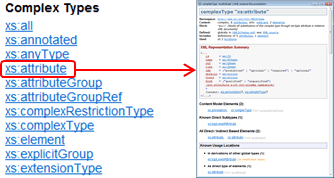
On the following screenshot you can see a set of Location Rules to collect ancestor types (i.e. XML elements representing them) for a Type Derivation Tree in XML schema documentation (click to enlarge):
 Here, the
Location Rules
are specified among the properties of the Element Iterator section.
Here, the
Location Rules
are specified among the properties of the Element Iterator section.
Each rule corresponds a particular type derivation method available in XSD. The rules are interpreted against a given XSD type, which produces a sequence of all ancestor types starting from that initial type itself (the first rule just includes it in the sequence). Then, the iterator prints the collected sequence in reverse order as a tree:

FlexDoc/XML supports XML catalog files in OASIS XML Catalogs v1.1 format.
XML catalogs can be used in processing of input XML files, for which they should be specified with -xmlcatalog option or in a special dialog (part of the generator GUI):
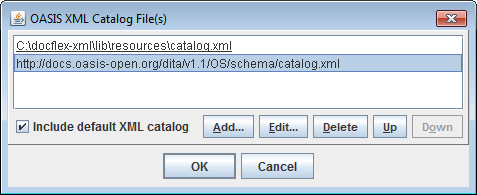
Additionally, XML catalogs are used in definitions of XML Types based on multiple XML schemas (see xsd.catalogs config property).
For more details, please see: FlexDoc/XML | Documentation | Installation / Configuration Files | XML Catalogs
On the following screenshot you can see how the generation of summary table is programmed:

In that way the following formatting features are supported:
|
|
|
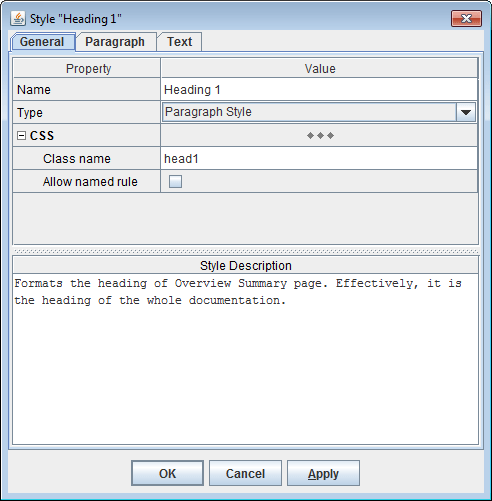
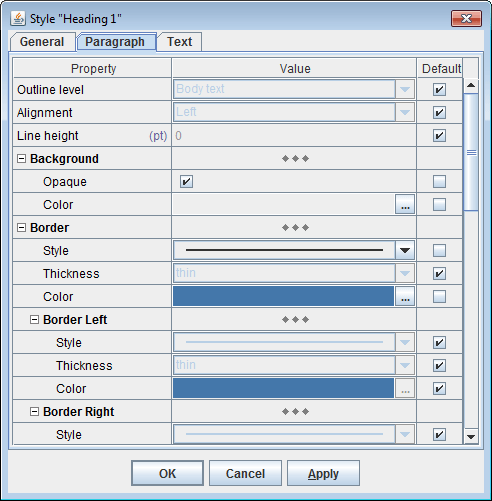
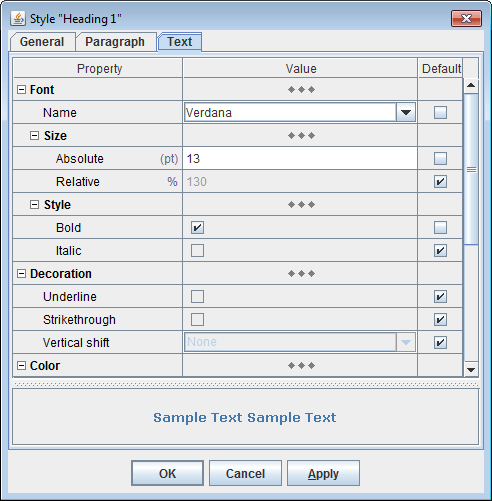
By that name the style can be assigned to a template component. When the component has a formatting style, those formatting properties not specified on the component directly are inherited from the style.
Formatting styles are template local things. That is, they are not imported from somewhere outside. However, when a template is called from another template, the styles defined in the caller template will override the equally named styles defined in the called one. When multiple templates are called one from another, that will work in a chain. So, the styles defined in the main template will override any equally named styles defined elsewhere. As a whole, formatting styles behave as additional template parameters passed implicitly by their names.

|

|
For further details, please see: FlexDoc.XYZ | Documentation | Usage of CSS in generated HTML
<xs:documentation> elements of XSD files).
This must be programmed entirely in a template,
which converts all XHTML tags to normal HTML tags (e.g. by removing 'xhtml' namespace prefix from the tag names).
Further, everything will be processed by the generator itself as embedded HTML.
 |
 |
In this case, the XHTML tags are processed in XSDDoc/lib/ann/annotation.tpl template, which also takes care of images (inserted with <img> tags); they need to be copied to the documentation destination directory.
See also: FlexDoc/XML | XSDDoc | FAQ | Formatting annotations with XHTML
In case of HTML/XHTML output, little needs to be done (if only fixing wrong HTML markup or converting it to XHTML).
However, in case of RTF, the embedded HTML needs to be fully parsed and interpreted with the corresponding formatting features available in RTF, at that this everything must be integrated with the formatting imposed by the settings in templates. That is supported for almost all HTML tags practically usable in documentation comments (including inserting of images):
| Text | <b>, <strong>, <i>, <em>, <code>, <tt>, <u>, <s>, <strike>, <sub>, <sup>, <font>, <br> |
| Paragraphs | <p>, <center>, <div>, <pre>, <h1>, <h2>, <h3>, <h4>, <h5>, <h6>, <blockquote> |
| Lists | <ul>, <ol>, <li>, <dl>, <dt>, <dd> |
| Table | <table>, <tr>, <td>, <th> |
| Other | <hr>, <img>, <a>...</a> |
Example:
 |
 |
On the left is the same XML schema as in the demo above. For comparison, the HTML version of the same page you can see here.
The XML schema on the right is this one: http://www.w3.org/2001/xml.xsd
wsdldoc.imageProvider.name
See also: Diagramming Plugins
Example:
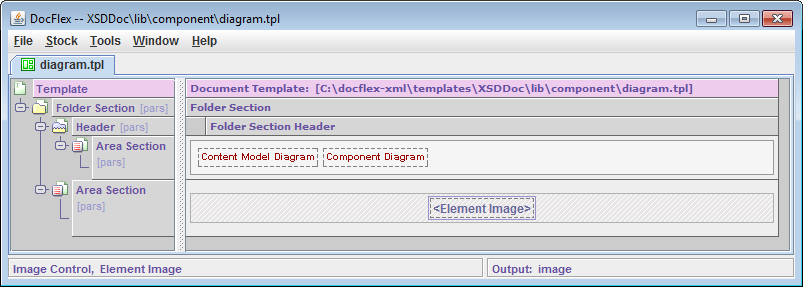
On the left screenshot you can see diagram.tpl template (from XSDLDoc template set), which prints a component diagram section. The diagram is inserted in the output via the Image Control specified to generate “element image”. The right screenshot shows a piece of output produced by this template:
 |
 |
<xs:documentation> in XSD files)
may include XHTML tags specifically processed
by a given template set, images can be inserted using
<img> tags.
Example:
After processing such an annotation, the generator will produce the following fragment of HTML:

The following formats of incoming images are supported: GIF, PNG, JPG, WMF, EMF, BMP
Example:
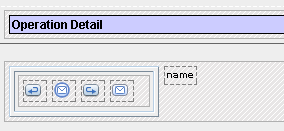
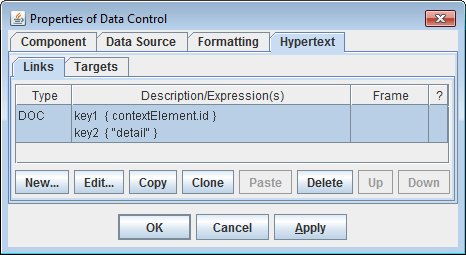
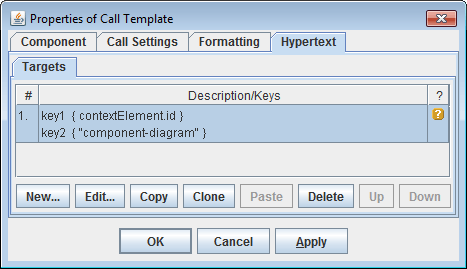
Suppose we need to generate a list of some components and link the list items to the corresponding component details:
{contextElement.id, "detail"}.
The first key 'contextElement.id' represents the component itself
(it's the unique ID of the DSM element representing the component).
The second key is the string "detail". It says that what we want to link to is the component's entire details.
This is needed because there may be other sections in the documentation dedicated to the same component, which may be linked to as well
(including some subsections within the detail).
 |
 |
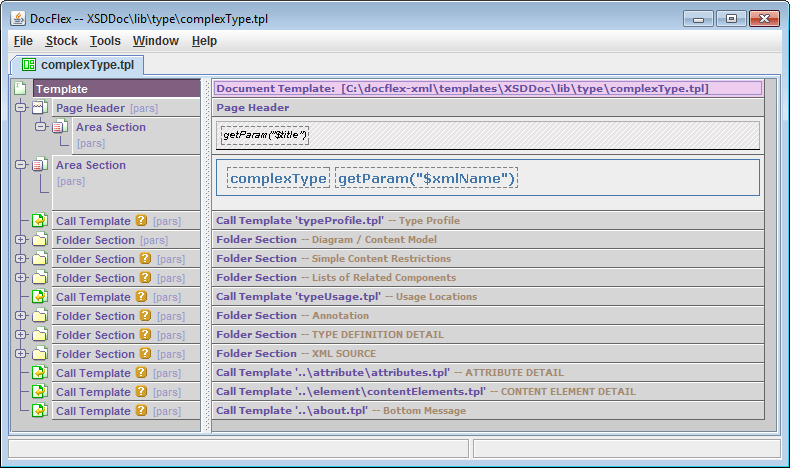
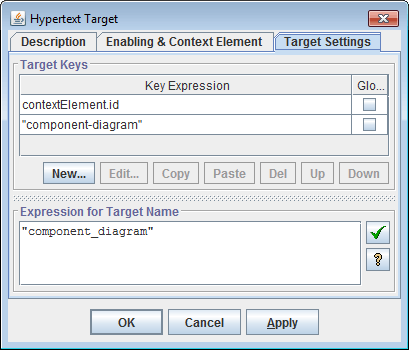
The component detail is generated by the template shown below (left screenshot).
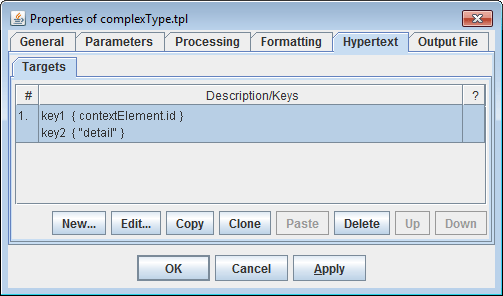
The link target is defined in the template properties (right screenshot).
It's again determined by the same pair of keys: {contextElement.id, "detail"}.
 |
 |
Such definitions allow the generator to create hyperlinks automatically. Each time the sets of keys produced by some possible link source and destination are matching, the actual hyperlink is generated. In that way anything can be cross-linked together. At that, if a particular set of keys cannot be matched, an alternative set of keys can be specified as well. That means, when the primary target is absent, the link can go to some alternative location related to the link source.
 |
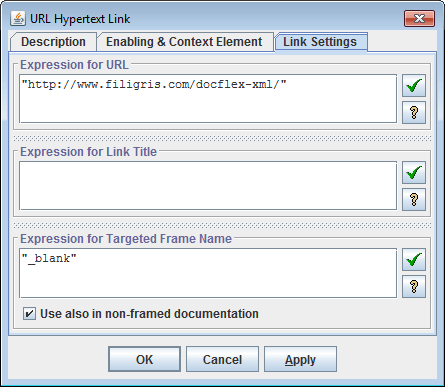 |
The incoming hyperlinks from external pages into the generated documentation can be supported as well. Each hypertext target (anchor) is generated by a definition like shown below (left screenshot). It is specified in the properties of the component whose output is targeted. Typically, the anchor name is generated automatically and, therefore, meaningless. But it can be any predefined string generated by an expression specified in the properties of the target definition (right screenshot below), which can be used in the URL of the incoming link.
 |
 |
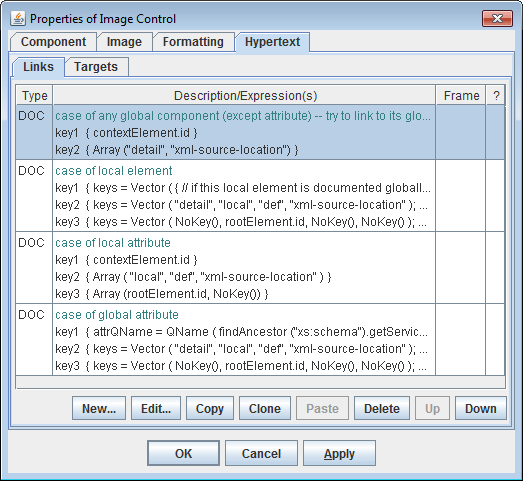 Generic image maps, which associate the image areas with particular DSM elements
(representing something depicted in those areas),
come from the data source along with the element images themselves.
But those associations need to be converted into actual hyperlinks going to the corresponding sections of the documentation.
Generic image maps, which associate the image areas with particular DSM elements
(representing something depicted in those areas),
come from the data source along with the element images themselves.
But those associations need to be converted into actual hyperlinks going to the corresponding sections of the documentation.
That is programmed in properties of the Image Control (that inserts the element image) as shown on the screenshot.
It looks the same as a definition of ordinary cross-link. The difference is that it is interpreted against every image area, so that the DSM elements associated with that area is made the generator context element and the hyperlink is generated by it. In that way each image area gets its actual hyperlink.
| Format | What's special |
|---|---|
| HTML |
Hyperlink Title
It is a small text generated by a “Link Tile” expression specified in the properties of the hyperlink definition.
In HTML, hyperlink titles are set using title attribute, like this:
<a ... title="link tooltip text"> ... </a>
Most browsers interpret it as a hyperlink tooltip (a tiny window with the text that appears near the hyperlink when the mouse cursor is moved over it):
|
| RTF |
Page Number References
RTF supports similar hyperlinks as HTML.
But this is good in electronic form.
Once you have printed something on paper, you cannot click on it.
So, how to navigated the printed documentation?
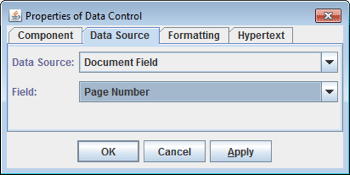
In RTF, cross-links can be represented also in the form of page number references, which is programmed as follows.
A Data Control is specified in a template:
That's all. The generated RTF will look as on this page (in square brackets you see page number references; click to enlarge):

|
| TXT | See: Images and hyperlinks in plain-text output |
That is possible only when such a format is eventually plain-text based (not binary). But that's the case for probably all modern formats (e.g. TeX, DITA, JSON etc). Of course, you will need to specify in templates all necessary markup (tags, control words etc.) specific for that format.
Yet, plain-text output may be just a base layer for other file formats, for instance DITA, which is an XML-based markup. There, both images and hyperlinks do exist and are required.
The following functionality will allow you to use plain-text output capability of FlexDoc/XML to generate some full-blown complex formats even when they are not supported by FlexDoc/XML directly.
Images
In plain-text mode, an Image Control will produce the same image file (according to its setting). However, in addition, it also emits into the main output the image file's relative pathname. That pathname is calculated against the main file's location and the name-separator is UNIX style ("/"). In a template, you can surround the Image Control with other Text Controls generating some markup, so everything would produce both the image file and the image tag for it in the main output.Hyperlinks
You can generate cross-hyperlinks in plain-text files too. This equally includes the hyperlinks from images (the imagemaps).What exactly a hyperlink is depends on the final format you generate using the plain-text output. FlexDoc/XML just provides the necessary functionality to find the things you want to link from and to. This is implemented in the form of new FlexQuery functions and GOM types/properties ("GOM" stands for Generator Object Model):
| Function/Type/Property | Description |
|---|---|
findHyperTarget()
|
Finds a hyperlink target matching the specified set of keys that may exist anywhere
in the whole generated documentation. Returns a GOMHyperTarget object describing the target.
|
GOMHyperTarget
|
Provides information about a hyperlink target. This includes the output file containing the target and the target name. |
getElementImageMapAreas()
|
Returns all hypertext imagemap areas of the element image
associated with the specified element.
The function returns an array of GOMImageMapArea objects.
|
GOMImageMapArea
|
Represents a single area in the hypertext imagemap of an element image.
This includes the area bounds (rectangle) and the referenced GOMElement.
|
GOMElement.hasImage
|
Indicates whether the element has a certain image representation (element image). |
More information about these functions and types you can find in the Template Designer | Help | Assistant:
So, besides command line options, FlexDoc/XML Generator provides a more user-friendly way to specify everything interactively – the Generator GUI.
|
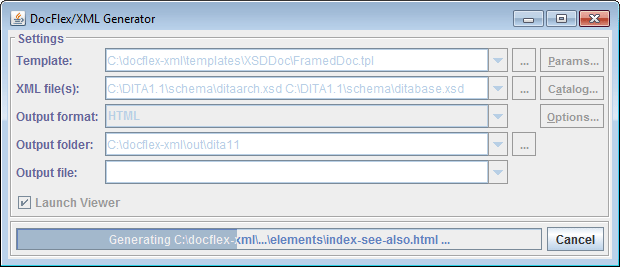 |
The «Params» button invokes the Parameter Inspector, where you can edit all parameters of the specified main template.
In a special dialog invoked by the «Catalog» button, you can add XML catalogs that will be used during processing of input XML file(s).
The «Options» button invokes the Option Inspector corresponding the selected Output format.
When all settings are prepared, you can start the generation by clicking «Run» button. Then, the generator dialog will transform itself to show the generation progress.
You can stop the generation at any moment by clicking «Cancel» button.
Once the generation has finished (or cancelled), the generator dialog transforms itself back into its initial state.
|
|

|

|
Here you can edit the parameter or option values according to their data types. The bottom panel in the inspector dialog shows the HTML-preformatted description of each parameter or format-specific generator option.
For further details, please see: FlexDoc/XML | Documentation | Running Generator | Generator GUI
 Allows you to compile any number of generic XML files into a web-ready HTML or printable RTF documentation with the optional
inclusion of a namespace binding report that shows which namespace prefixes are bound to which namespace URIs and where.
Allows you to compile any number of generic XML files into a web-ready HTML or printable RTF documentation with the optional
inclusion of a namespace binding report that shows which namespace prefixes are bound to which namespace URIs and where.
On the left screenshot you can see a demo documentation generated with XMLDoc (click to view the real HTML).
For further details, please see: FlexDoc/XML | Sample | XMLDoc
 Implements a very powerful XML Schema Documentation Generator able to produce both multi-framed Javadoc-like
HTML and printable RTF documentation.
Implements a very powerful XML Schema Documentation Generator able to produce both multi-framed Javadoc-like
HTML and printable RTF documentation.
It supports also the integrations with both XMLSpy and Oxygen XML Editor, which allow you to insert automatically the XSD diagrams produced by either of those systems into the XML schema documentation generated by XSDDoc (with the full support of diagram hyperlinks).
On the left screenshot you can see a demo documentation generated with XSDDoc (click to view the real HTML).
For further details, please see: FlexDoc/XML | XSDDoc
") This template set implements a combined WSDL/XSD documentation generator that will allow you
to document both WSDL and XML schema (XSD) files as well as any interconnections between them.
This template set implements a combined WSDL/XSD documentation generator that will allow you
to document both WSDL and XML schema (XSD) files as well as any interconnections between them.
It supports also the integrations with both XMLSpy and Oxygen XML Editor, which automatically insert the XSD diagrams produced by either of those systems into the documentation generated by WSDLDoc (with the full support of diagram hyperlinks).
On the left screenshot you can see a demo documentation generated with WSDLDoc (click to view the real HTML).
For further details, please see: FlexDoc/XML | WSDLDoc
 DiagramKit is the FlexDoc/XML native diagramming engine (independent on any third-party software).
It is included in FlexDoc/XML and will work by default.
DiagramKit is the FlexDoc/XML native diagramming engine (independent on any third-party software).
It is included in FlexDoc/XML and will work by default.
Currently it is able to generate XSD diagrams (similar to those produced by XMLSpy) and insert them automatically into the documentation generated by XSDDoc/WSDLDoc (with the full support of diagram hyperlinks).
On the left you can see an XML schema documentation with XSD diagrams generated by DiagramKit (click on the screenshot to view the real HTML).
For more details, please see: FlexDoc/XML | DiagramKit.
 The integration of FlexDoc/XML with Altova XMLSpy (see http://www.altova.com/xmlspy/)
allows you to automatically insert graphic diagrams produced by XMLSpy into the documentation generated by XSDDoc/WSDLDoc
(with the full support of diagram hyperlinks).
The integration of FlexDoc/XML with Altova XMLSpy (see http://www.altova.com/xmlspy/)
allows you to automatically insert graphic diagrams produced by XMLSpy into the documentation generated by XSDDoc/WSDLDoc
(with the full support of diagram hyperlinks).
On the left you can see an XML schema documentation with XSD diagrams generated by XMLSpy (click on the screenshot to view the real HTML).
For more details, please see: XMLSpy Integration.
 The integration of FlexDoc/XML with Oxygen XML Editor (see http://www.oxygenxml.com)
allows you to automatically insert graphic diagrams produced by OxygenXML into the documentation generated by XSDDoc/WSDLDoc
(with the full support of diagram hyperlinks).
The integration of FlexDoc/XML with Oxygen XML Editor (see http://www.oxygenxml.com)
allows you to automatically insert graphic diagrams produced by OxygenXML into the documentation generated by XSDDoc/WSDLDoc
(with the full support of diagram hyperlinks).
On the left you can see an XML schema documentation with XSD diagrams generated by OxygenXML (click on the screenshot to view the real HTML).
For more details, please see: OxygenXML Integration.