")
")
DiagramKit is implemented as a diagramming plugin, which is a replaceable part of FlexDoc/XML that provides some graphical representations of XML elements. It is another add-on to FlexDoc/XML and licensed separately.
Below are two sample diagrams generated by DiagramKit (click on the screenshots to view each diagram inside the documentation):
|
|
For more sample documentation with diagrams generated by DiagramKit, please see:
<xs:annotation> elements).
The wrapping of annotation text is optimized so as to maximally
utilize the empty space arisen in the diagram because of its particular layout, thereby minimizing the bloating of the diagram by annotations themselves.
This allows making the whole diagram more compact, as shown on this screenshot:

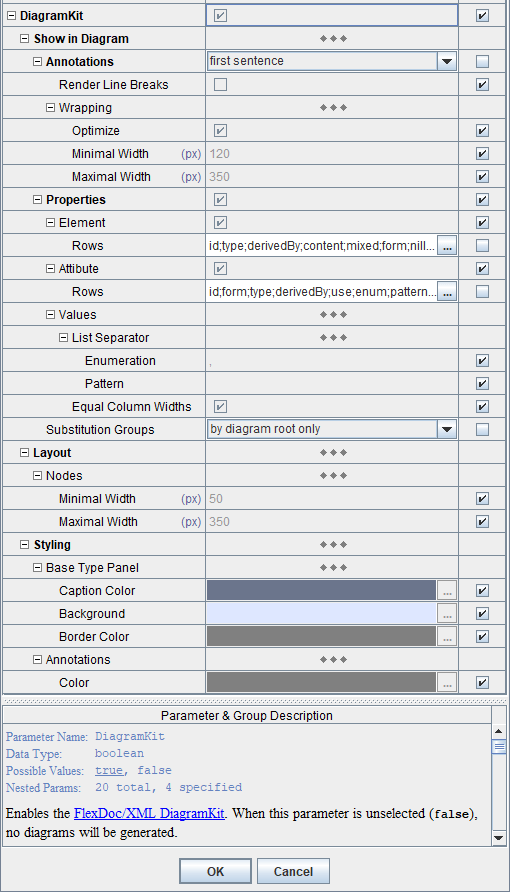
Properties provide extra information such as the element/attribute type, content, facets, default value etc. Properties are displayed in the little grid embedded within the diagram node that depicts the element/attribute. Some of the properties are hyperlinked to the corresponding pieces of the documentation. For further details, please see: FlexDoc/XML | DiagramKit | FAQ | Component Properties.
The following screenshots show two diagrams of the same XSD component. The diagram on the left is with element/attribute properties. On the right, it is without the properties. Click on the screenshots to see each diagram within the corresponding documentation:
") |
") |
XMLSpy diagrams show only extended base types. The restricted base types are absent at all. The attributes inherited from them are joined with those defined in the given component, however highlighted with the yellow background.
The wrapping of annotations is optimized so as to maximally use the empty space available in the diagram because of its layout, thereby making the whole diagram more compact.
Error occurred during initialization of boot layer

java.lang.module.FindException: Module javafx.base not found, required by flexdoc.xml.diagramkit
But since Java 11, Oracle has moved JavaFX into a separate project found on openjfx.io. Now, those who need JavaFX should download JavaFX SDK separately from there, install it and specify all JavaFX dependencies in their Java application according to that installation. That, of course, is too complicated for many ordinary users, and breaks down the whole idea of using some generic JRE pre-installed on user's computer (independently on FlexDoc/XML).
However, as a compensation for all that perturbation (and actually as its goal), since Java 11, anyone could build their own custom JRE (called «runtime image») that would include in itself any 3rd party modules necessary to run a given application on a particular computer platform.
Now, we took that new opportunity and prepared our own FlexDoc JRE (OpenJDK+JavaFX images) to run FlexDoc/XML+DiagramKit on Windows, Linux and macOS immediately. Just download this Java from our website and don't bother with anything else!
Both possibilities are described below:
'{flexdoc-xml}'.
“FlexDoc JRE (OpenJDK+JavaFX) to run FlexDoc/XML+DiagramKit | Windows/x64 (zip)”
flexdoc-jre-17_windows.zip
{flexdoc-xml}. You will have a folder:
{flexdoc-xml}\jre
{flexdoc-xml}\DiagramKit\
Now, you can immediately start generator.bat and designer.bat found there
to run Template Processor / Template Designer
with DiagramKit activated as the diagramming engine.
“FlexDoc JRE (OpenJDK+JavaFX) to run FlexDoc/XML+DiagramKit | Linux/64 (tar.gz)”
flexdoc-jre-17_linux.tar.gz
{flexdoc-xml}. You will have a folder:
{flexdoc-xml}/jre
{flexdoc-xml}/DiagramKit/linux/
You will find generator.sh and designer.sh prepared to run respectively
Template Processor / Template Designer
with DiagramKit activated as the diagramming engine.
generator.sh / designer.sh as a program.
generator.sh / designer.sh!
However, we take advantage of that Apple still allows the macOS users to install and run on their computer the executables built by those users themselves. So, instead of preparing a ready to install & run FlexDoc JRE, we offer you an easy way to build it by yourself (which differs from the former mostly by the size of the downloaded archive file).
“FlexDoc JRE (OpenJDK+JavaFX) to run FlexDoc/XML+DiagramKit | macOS/64 (zip)”
flexdoc-jre-17_macOS.zip
{flexdoc-xml}. You will have a folder:
{flexdoc-xml}/build_jre
openjdk-17_macos-x64_bin.tar.gz – from https://jdk.java.net/17/
openjfx-17.0.0.1_osx-x64_bin-jmods.zip – from https://gluonhq.com/products/javafx/
{flexdoc-xml}/build_jre/build_jre.command
'build_jre.command' straight, that is easy to overcome:
'build_jre.command' with TextEdit (confirm in the warning box that it is OK to open it).
Then, simply resave that file via File | Save menu.
With that procedure, you will sign 'build_jre.command' as its owner/creator, which is a precondition to be able running it.
'build_jre.command' with the executable privilege.
Run the Terminal and type in it 'chmod u+x' followed by a space and the full pathname of the script file
(instead of typing it, just drag 'build_jre.command' from the Finder into the Terminal window). Then, press Enter.
'build_jre.command' from the Finder just by clicking twice on it.
'build_jre.command', a new directory will be created:
{flexdoc-xml}/jre
'build_jre' folder can be deleted then.)
{flexdoc-xml}/DiagramKit/macOS/
You will find generator.command and designer.command prepared to run respectively
Template Processor / Template Designer
with DiagramKit activated as the diagramming engine.
'chmod u+x' followed by a space,
dragging script.command into the Terminal window and pressing Enter).
Then, you will need:
Concerning the compatibility of different versions of Java (JDK) and JavaFX. As of Aug 2021, all currently released JavaFX versions 11-17 will work with JDK 11 or later.
openjfx-17_windows-x64_bin-sdk.zip
Do not download “JavaFX Windows jmods” archive also available there! That is not a proper JavaFX SDK. Although, JMOD files contain some compiled images of Java modules, they can be processed only by jlink command, used to build a custom JRE.
Unpack the downloaded archive somewhere. You will get a folder like this:
C:\javafx-sdk-17
{flexdoc-xml}\DiagramKit\
Edit generator.bat / designer.bat found in that directory, in these lines:
::----------------------------------------------------------------------

:: Specify the location of Java 11 (or later) here. The default setting:

::

:: set JAVA_HOME=%FDH%\jre

::

:: assumes the installation of FlexDoc JRE (OpenJDK+JavaFX),

:: which you can download from http://www.flexdoc.xyz/downloads/

::----------------------------------------------------------------------


set JAVA_HOME=C:\Program Files\Java\jdk-17


::----------------------------------------------------------------------

:: Specify the location of JavaFX SDK 'lib' directory, e.g.:

:: C:\javafx-sdk-17\lib

::

:: Note: When you use FlexDoc JRE, leave this setting empty

::----------------------------------------------------------------------


set PATH_TO_FX=C:\javafx-sdk-17\lib
generator.bat / designer.bat to run
Template Processor / Template Designer
with DiagramKit activated as the diagramming engine.
openjfx-17_linux-x64_bin-sdk.zip
Do not download “JavaFX Linux jmods” archive also available there! That is not a proper JavaFX SDK. Although, JMOD files contain some compiled images of Java modules, they can be processed only by jlink command, used to build a custom JRE.
Unpack the downloaded archive somewhere. You will get a folder like this:
/home/user/javafx-sdk-17
{flexdoc-xml}/DiagramKit/linux/
You will find generator.sh and designer.sh prepared to run respectively
Template Processor / Template Designer
with DiagramKit activated as the diagramming engine.
Edit generator.sh / designer.sh in these lines:
#----------------------------------------------------------------------

# Specify the location of Java 11 (or later) here. The default setting:

#

# JAVA_HOME="$FDH/jre"

#

# assumes the installation of FlexDoc JRE (OpenJDK+JavaFX),

# which you can download from http://www.flexdoc.xyz/downloads/

#----------------------------------------------------------------------


JAVA_HOME="/home/user/jdk-17"


#----------------------------------------------------------------------

# Specify the location of JavaFX SDK 'lib' directory, e.g.:

# /home/user/javafx-sdk-17/lib

#

# Note: When you use FlexDoc JRE, leave this setting empty

#----------------------------------------------------------------------


PATH_TO_FX="/home/user/javafx-sdk-17/lib"
generator.sh / designer.sh as a program.
generator.sh / designer.sh.
openjfx-17_osx-x64_bin-sdk.zip
Do not download “JavaFX Mac OS X jmods” archive also available there! That is not a proper JavaFX SDK. Although, JMOD files contain some compiled images of Java modules, they can be processed only by jlink command, used to build a custom JRE.
Unpack the downloaded archive somewhere. You will get a folder like this:
/Users/Shared/javafx-sdk-17
{flexdoc-xml}/DiagramKit/macOS/
You will find generator.command and designer.command prepared to run respectively
Template Processor / Template Designer
with DiagramKit activated as the diagramming engine.
Edit generator.command / designer.command in these lines:
#----------------------------------------------------------------------

# Specify the command used to invoke JVM (Java 11 or later) here.

# The default setting:

#

# JAVA_COMMAND="$FDH/jre/bin/java"

#

# assumes the installation of FlexDoc JRE (OpenJDK+JavaFX),

# which you can download from http://www.flexdoc.xyz/downloads/

#----------------------------------------------------------------------


JAVA_COMMAND="java"


#----------------------------------------------------------------------

# Specify the location of JavaFX SDK 'lib' directory, e.g.:

# /Users/Shared/javafx-sdk-17/lib

#

# Note: When you use FlexDoc JRE, leave this setting empty

#----------------------------------------------------------------------


PATH_TO_FX="/Users/Shared/javafx-sdk-17/lib"
generator.command, first, open it with TextEdit (confirm in the warning box that it is OK to open it).
Then, simply resave that file via File | Save menu. By doing that you will sign generator.command as its owner/creator,
which is a precondition to be able running it.
Then, you need to assign generator.command with the executable privilege.
Run the Terminal and type in it 'chmod u+x' followed by a space and the full pathname of the script file
(instead of typing it, just drag generator.command from the Finder into the Terminal window). Then, press Enter.
Now, you can run generator.command from the Finder just by clicking twice on it.
designer.command.
  {flexdoc-xml}/DiagramKit/ant/

  {flexdoc-xml}/DiagramKit/maven/

  {flexdoc-xml}/DiagramKit/README.html
That's because you can choose to use another diagramming plugin (e.g. XMLSpy Integration or OxygenXML Integration) or none at all instead.
To accommodate all possibilities concerning licensing, DiagramKit will work in the following modes:In demo mode, DiagramKit will work together with either XSDDoc/WSDLDoc when no other licenses are installed for both DiagramKit and the given template set. If you run XSDDoc or WSDLDoc, you will see a message like this:

In demo mode, DiagramKit will generate only limited number of component diagrams. How many depends on the demo limits of a particular main template. However, any diagrams generated in demo mode will be complete and without trial markers.

")
Then, you will be redirected to Try | Trial License page with “FlexDoc/XML” preselected in the «Product» field.
'flexdoc-xml.license' file, which you will receive by email.
'lib' directory (near 'flexdoc-xml.jar' file):
{flexdoc-xml}/lib/
where '{flexdoc-xml}' denotes your FlexDoc/XML installation directory.
See Also:
Please Note: